Brakes iffy, partial clutch, battery takes no charge and no exhaust but it moves.
Sunday, October 07, 2012
Life at last !!!!!
Brakes iffy, partial clutch, battery takes no charge and no exhaust but it moves.
Sunday, September 23, 2012
How's this fit together ?
After a lovely holiday in Greece and some new found enthusiasm I set too bolting back the engine bay ancillaries.
First up was emptying the gearbox of oil. I did this a few weeks ago but left the 4 litre milk container in situ whilst I holidayed. I wondered long and hard about the amount to put back in. Several of the usual sources said 4.5 pints ( UK pints) some said 6 pints. WTF ? Well almost 4 pints came out as I've the plastic milk container to prove it. More searching revealed that the gearbox ( with Overdrive takes 6 pints) luckily found the answer in my Haynes manual, who says men don't read the instructions.
Filling up was a farce. First I undid the wrong topping up bolt. I knew from my meanderings it was tricky to fill up the gearbox as the filling hole is rather awkwardly positioned. I assumed it was just out of sight under the firewall/scuttle and just ( only just) accessible from the engine bay. It was a real struggle undo the nut with very limited access. How to fill/get a funnel/pipe in there though ?
As it happens whilst reading the Haynes manual I read the following chapter and it all came to light, viz-:
1/. Drain the Overdrive at the same time as the gearbox, they share the same oil.
2/. The filler plug is also a filler/leveller plug and is located on the LH side of the gearbox, access from underneath the car.
That cheered me up no end as I now had a definite plan to work to and as long as I remembered to replace the drain plugs we're off to a flying start.
That was the easy bit.
Removing the filler plug was easy enough, I had TWO sizes of funnel to re-fill with and a mighty Pneumatic hose length ( 400mm) to do the job.
It was too big in diameter to fit into the drain hole !!
More rooting around in the many plastic boxes and food bags inside the car gave me the ideal pneumatic hose size. This hose came directly off a PBE- P14, 5 Ton hot stamping machine that had been skulking around in my old "work" toolbox ( the hose, not the machine), along with a multitude of pneumatic fittings and metric nuts, bolts and washers. A quick soak of one end in wifeys favourite mug + boiling water saw the end slip over the funnel nicely.
I even had a calibrated measuring jug left over from the brake bleeding session. Or should that be "bleeding brakes" ? Max capacity 2 pints. No worries, 3 jug fulls should be perfect.
Well what a performance. It took ages for it to run down the pipe/ funnel and into the gearbox. At least 45 mins per jugfull (2 pints), maybe longer as I kept scroaming under the car to wiggle the pipe, lose some dribbles, mop up, pull the pipe, shake the car and ponder on the carb linkages I put together wrongly.
After 2 jugs (4pints) I called it a day. After all it was 5 pm on a Saturday and my team had lost at home.
The following day saw me up early and at it like a man possessed.
Between the 5 minute top ups of the small funnel I loosened the RH carb and turned round the throttle linkage, fitted the springs and throttle cable, oil cooler and pipe ends, fitted the Alternator and coil, and found the radiator, hoses and screws.
The alternator was a swine. When first fitted the pulley was not in line with the other two pulleys, at least half a pulley forwards. Loads of head scratching, spannering and jiggling saw me put it back as it was to start with, as brute force and ignorance was needed, not careful logic.
So the moment of truth will arrive in the next week or two.
What moment of truth I hear you ask !
Well I have my suspicions that the block is cracked.
a/. two core plugs have been tapped firmly home after weeping rusty water
b/. emulsified oil, hence the head gasket change
c/. I left it all winter full of water with no antifreeze in, hence above.
So next up is another purchase of B&Q's 20/50 cheapo oil, Winns engine flush and decent anti corrosion/anti freeze for the start up/
Before that though I have to put a large coach bolt through the driveway gate or I can't open the gate without fear of it falling on beloved MG. Then enlist help pushing car down drive, reversing it out and back down the drive so I can start it nose to nose with family Clio runabout as "jumper". Not that easy with Son No 1 now away at Uni and only 2 girly girls in the house.
Wish me luck.
Bye the bye.........Why no comments ? Listen guys i need em. Its a lonely life being skint and clueless. Go on help make my week.
Monday, August 27, 2012
A little progress at last
So the enthusiasm has returned, against all the odds at that. Why ? Well work has been tough of late. Lots to learn, lots to remember, lots of things not to do and many many patients.I feel I'm getting to grips with it all now but I'm still regarded as a "newbie" even though I'm one of the oldest there.
I've also been very tired each night and weekends. But, and a very big but wifey booked a holiday in Greece starting early Sept and gifted me £200 from her inheritance ( It also paid for the holiday) so I've had a spring in my step since and money to spend.
I've had the head skimmed ( and pressure tested, it passed) at a local shop and a fine job they did for £75. Got "Payen " gasket/set, cheapo 20/50 oil from B&Q ( Yes, good enough for me as I'll be replacing it soon after a good run and flush).
The head was collected on Sat morn and I devised a cunning device to replace the valves. It was a real struggle to remove them and managed to mangle up most of the trusty workmate lips.

I used one of the rubber bumper mounting brackets clamped in said workmate at just the right height ( this took a bit of trial and error) and used a Die wrench levered against underside and over spring cover. It worked a treat and did the job in no time.

I spent ages cleaning engine head and cylinder head before attaching the Payen gasket and making each other meet seamlessly and cleanly. I was going to paint the cylinder head but could not be arsed with all the degreasing, cleaning primering and painting as well as visiting the shops for a suitable engine paint. So on it went. I struggled to remember which studs went where but eventually worked it out and put the new torque wrench to good use by tightening to 30ft/lbs then to 48ft//lbs.
Next on with the exhaust manifold and inlet manifold, followed by the heat shield, new gaskets and very very fiddly carb nuts. The front lower LH nut was a swine and took about 40 mins of hard awkward spannering to complete. I'm sure I used the wrong nut, maybe. But its on and tight.
Still puzzling over the throttle lever mechanism and single spring. WTF does it attach to. Anyways, I left that for now and got on with other things. Fitted Heater valve and new gasket. What a struggle. Again the lower nut was hard to reach and little or no spannering room. In these situations I just sit and have a fag then get back to it, sometimes with a little swearing. Fitted carb/crankcase breather pipes and replaced the long oil cooler pipe ( see earlier post for meeting of alternator & pipe).
I also drained the engine oil into several plastic containers. I say oil, more like yellow/creamy stuff. I should add this was the first job of the latest round of enthusiasm. I managed to spill some under the car when the bottles overflowed. I consoled myself with the fact we'll be having the drive tarmacked anyway. Look !

Not included is the gearbox oil which is draining into a 4pt plastic milk bottle as we speak. It looks very old and more importantly BLACK. On day two I puzzled some more regarding the hoses and carb linkage and gave up again. Well, I did solve the pipe problem by viewing some old photos, then connected the servo vacuum pipe. Next up was the front end modification to chrome bumper. I have the bumper, mounting bracket but not the chrome attachment screws. Anyways I'm fitting a MG spoiler rather than the original lower valance which would need more welding and cutting. I had decided earlier on in the head gasket issue that I would remove the front chassis rails whilst the radiator and oil cooler was out. It was easier than I expected. A few slices with the cutting disc in scary grinder and some boring grinding of the chassis base spot welds and job done.
Then I got fed up of the intermittent but light drizzle and called it a day so I could do nothing for the rest of the bank holiday.


Next up is welding plates onto the end of the rails above, fitting of the coil, Alternator, Radiator and oil cooler/pipes. New valve for front tyre, buy some engine flush and coolant/inhibitor + diff oil and top up, fill with cheapo oil and water then ready for start up and test drive up/down cul-de sac ( after testing brakes and engine temp) I think I might temporarily fit the dash for this, dunno yet.
First up though is a holiday in Greece ( all inclusive = yahhhaaay) with wifey and NO KIDS.
Monday, July 30, 2012
Update on ponderings
After the mish mash of one afternoons potterings taking off the cylinder head I've left the MG dormant for a while.
No particular reason. The weekends have been good weather but work has taken its toll. I must say being an itinerant industrial printing machinery salesman ( or Student for that matter) did leave me with much more energy for weekend frolics. I've not done such a physical job for over 35 years and when your in your mid fifties a lazy day or several is a must.
The ponderings are this :-
Does the "mayo" come from a cracked Head or Block ?
Is it because I didn't tighten the Head nuts according to the correct torque ?
Has my stupidity of not adding antifreeze during winter had terrible results ( Cracked block ) ?
My answer/s are still unclear.
a/. Cracked or warped Head ? Warped should see a £30 ish head skim correct this. Cracked , well time to save for a new unleaded head..........big probs ( No/not enough cash )
b/. Cracked block.....even bigger probs and a big long job. Not something I could do without a garage or have confidence to know what parts need replacing/ regrinding.
c/. Just buy another Head gasket " Payen type" and torque wrench, fit, flush and forget about .
d/. Bob-on with the s**t-load of other bodywork sanding and flatting, fit doors and winders to align doors, wings plus tackle front end chrome bumper mods ( alter indicator holes, grind off front chassis rails, weld captive nuts for bumper irons, modify lower valence for aforementioned.
As a precursor to any of this I've bought a torque wrench.....yahoo. This new toy ( arrives this week) will allow me to go over the front and rear suspension and leave me feeling a little happier knowing its all tickety boo.
I still wonder if I've fitted the correct front springs. I bought them on E-bay from a guy in the same town as me ( actually 1/4 mile away) and he said they were from a chrome bumper car. Trouble is the front end looks very high. Methinks even though they were shorter they may have been from a V8 thus much stiffer resistance for my car.
Just another worry of restoring a classic car on a shoestring and feckless heart.
I'm sure the enthusiasm and energy will come back....hopefully soon. I'm hoping the torque wrench does the trick.
All things considered I've achieved a lot this last few years and accomplished the seemingly impossible with time, patience, Internet trawling ( look up John Twist- University motors, on YouTube & BBS subjects on MG forums) and determination. So' I'm not going to fall at the last and supposedly most pleasurable hurdle of fitting up and interior re-trim ( The most costly though )
Wish me luck, send me money, post encouragement or just stop by to say a few words I need 'em all.
Sunday, July 15, 2012
Dotty, Seals, and emulsion
Where to begin. First of all an apology for not posting sooner. Where does time go ?
My only excuse is that starting the new job has seen me exhausted each night with the mass influx of information, regulations, new faces, protocols and doing the job. It is said by wise old sages that the first six months of a Radiography job is a steep learning curve, well they're wrong. There's no curve at all, its linear and vertical. The good news is that my six month contract has been extended to a further six months, now taking me to mid Feb, prior to anxiety kicking in re permanent employment. I also have an interview later in the week for a permanent job in one of the other hospitals I rotate to every six weeks, so wish me luck.
On to things MG wise.
Last post saw me wrestling with the conundrum of brake and clutch bleeding, after replacing all the seals possible on master and slave cylinders.
The Clutch master is a swine to remove. Its lower bolt is located under the main body, and only accessible via the dash end ( fortunately removed in my case) and some expert bodging of tools I'd acquired. I bought a 250cm ( 10") extension and ground a 1/2" square on the end and connected it to my (wifeys) knuckle extension. Even allowing for only one flats turn at a time and ages to get the socket onto the nut each time it was a real pain. A pain mostly because the seal kit was crap. On and off the master came at least for times, between each set me pleading for someone to help press the pedal whilst I was underneath opening and closing the bleed screw. Each time the clutch pedal was either too soft or said master piston stayed "in" after depression.
Depression is an emotive word, its how I felt after the umpteenth time of M/C removal and dis-assembly. Its a good job I bought 5 litres of DOT 4 Fluid. I've used half of it already, mostly dappled on the driveway floor....................Hence " DOTTY"
Depression crept in thinking I'd need a new Clutch M/C.......to expensive for me to justify to Wifey after the £ 200 of suspension and brake parts I was dying to road test. Hence my frustration at cheap but crap seal parts thwarting me. The brake M/C problem was similar, only there was no pressure emitting from the rear 3 way union at all. In the end I purchased a new brake warning switch and seals ( 2 types). But, and a big but, business end of the small cylinder to operate the switch would not budge from its long thin hole. The fantastic Mr Twist says just give it a firm tap " in gloved hand" on something solid. No chance. After several weekends of penetrating fluid soaking and poking it would not budge. Eventually I resolved it by using a punch to drive the rod in 2/3mm, then using a small electrical screwdriver to prise forward the rod. It mangled the rod somewhat but heyho. The brake warning switch the rod acts on was pants( £16.00). It disintegrated the first time I screwed it in. I spent ages trying to repair it but gave up. I ordered ( for £ 4.85) a 5/16" UNF bolt to blank off the port and left the useless rod/spring/tiny "o" ring out of the equation. Quess what ? It worked !. A fit of benevolence from wifey saw her sat in car ( reading Sunday supplement) whilst I bled all for corners. Its not perfect, with some sponginess but............F*** it, after so long another job done.
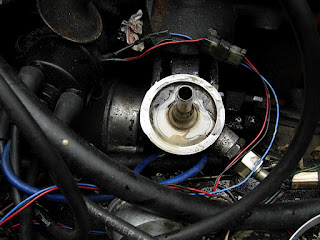
What had preyed on my mind though was the emulsion in the rocker cover and thermostat housing.
I took the bull by the horns today and fetteled it. LOOK !


My only excuse is that starting the new job has seen me exhausted each night with the mass influx of information, regulations, new faces, protocols and doing the job. It is said by wise old sages that the first six months of a Radiography job is a steep learning curve, well they're wrong. There's no curve at all, its linear and vertical. The good news is that my six month contract has been extended to a further six months, now taking me to mid Feb, prior to anxiety kicking in re permanent employment. I also have an interview later in the week for a permanent job in one of the other hospitals I rotate to every six weeks, so wish me luck.
On to things MG wise.
Last post saw me wrestling with the conundrum of brake and clutch bleeding, after replacing all the seals possible on master and slave cylinders.
The Clutch master is a swine to remove. Its lower bolt is located under the main body, and only accessible via the dash end ( fortunately removed in my case) and some expert bodging of tools I'd acquired. I bought a 250cm ( 10") extension and ground a 1/2" square on the end and connected it to my (wifeys) knuckle extension. Even allowing for only one flats turn at a time and ages to get the socket onto the nut each time it was a real pain. A pain mostly because the seal kit was crap. On and off the master came at least for times, between each set me pleading for someone to help press the pedal whilst I was underneath opening and closing the bleed screw. Each time the clutch pedal was either too soft or said master piston stayed "in" after depression.
Depression is an emotive word, its how I felt after the umpteenth time of M/C removal and dis-assembly. Its a good job I bought 5 litres of DOT 4 Fluid. I've used half of it already, mostly dappled on the driveway floor....................Hence " DOTTY"
Depression crept in thinking I'd need a new Clutch M/C.......to expensive for me to justify to Wifey after the £ 200 of suspension and brake parts I was dying to road test. Hence my frustration at cheap but crap seal parts thwarting me. The brake M/C problem was similar, only there was no pressure emitting from the rear 3 way union at all. In the end I purchased a new brake warning switch and seals ( 2 types). But, and a big but, business end of the small cylinder to operate the switch would not budge from its long thin hole. The fantastic Mr Twist says just give it a firm tap " in gloved hand" on something solid. No chance. After several weekends of penetrating fluid soaking and poking it would not budge. Eventually I resolved it by using a punch to drive the rod in 2/3mm, then using a small electrical screwdriver to prise forward the rod. It mangled the rod somewhat but heyho. The brake warning switch the rod acts on was pants( £16.00). It disintegrated the first time I screwed it in. I spent ages trying to repair it but gave up. I ordered ( for £ 4.85) a 5/16" UNF bolt to blank off the port and left the useless rod/spring/tiny "o" ring out of the equation. Quess what ? It worked !. A fit of benevolence from wifey saw her sat in car ( reading Sunday supplement) whilst I bled all for corners. Its not perfect, with some sponginess but............F*** it, after so long another job done.
What had preyed on my mind though was the emulsion in the rocker cover and thermostat housing.
I took the bull by the horns today and fetteled it. LOOK !

Top shows the cylinder head removed opposite no 4 cylinder. Bottom the oil filter when removed.
Since I'd removed the jubilee clips to the top rad hose ( to fasten round oil filter to remove it) some weeks earlier I decided to remove the rad, flush it out both ways and then some more. It was easy, which made a nice change from the last several weeks.
Some struggles with the twin carbs and manifold nuts but done rapidly if not a little fiddly then on to the head nuts. Surprisingly they came out easily after a few grunts. Could this be the problem ? did I torque them down sufficiently when I replaced the gasket the first time? I didn't have a torque wrench ( still don't- despite asking for one the last three Christmases) Did I use too much gasket sealant ? Should I have used sealant at all ? Was the gasket another cheap aftermarket crappy thing ?
Who knows. Here's after cleaning up half of the block top.


There was loads of rust at the water holes which makes me suspect I should have added antifreeze before now. A decision I regret. Good ole Lostsock. Never the wise when it comes to a peaceful life. It may also explain why 2 core plugs sort of tried to escape.
As it stands, its payday on Friday so I'll treat myself to a new original spec "Coopers Payen" head gasket, engine flush stuff ( which one though?) and coolant antifreeze/rad flush.
Next up will be the engine start and engine temperature monitoring, more bodywork (sanding, sanding and RH wing attachment).
P.S by way of a slight understatement we've had quite a bit of rain this summer and not just weekends.
Monday, May 07, 2012
from bad to worse
So, the impetus of having cash to spend on parts to fit has been and gone with a whimper.
Last post saw me frustrated at my lack of ability ( and assistance) regarding bleeding the brakes and clutch. I grabbed the bull by the horns and read up thoroughly on the task at hand ( well, surfed more like) and I happened upon a real nugget of vital information on the Chicago clubland forum. "You have to loosen the brake sensor ( located under the master cylinder) three and a half turns, or bleeding is impossible". Why did I have to seek so hard to find this out ?
Mr Porter, Mr Evans and even the noble Mr Twist say nothing of this fact.
Anyways it was a real eureka moment and spurred me on after another night shift at the very large Hospital (27 miles of corridors, yes 27, and I think I walked most of them that shift looking for the equipment and ward)
So undo the plastic sensor after first removing the two wires easy peasy. Too easy. The f***ing thing had seized solid in the threaded portion leaving the body to spin and spin. Acces is very poor as its on the underside, so there was no other thing to do other than remove the master cylinder.
My thinking was since I am removing it why not do a complete refurb of the seals then. A nice YouTube from Mr Twist even showed me how.
Wrong, Wrong very wrong.

Easy enough to remove from the car, 2 x 1/2" nut/bolts. Even managed to remove circlip from inside ( After "modifying" my { wife's actually but she don't know this yet} longnose pliers).
Innards came out easily, 2 x springs, 2 x shuttles + 4 x seals. I had to drive a screwdriver into the hole left by the broken body of the sensor and manfully undo it outwards. This done then on to the other end of the cylinder to remove the small shuttle and spring. The lovely and wise old sage Mr Twist says " wear a glove and tap it firmly on its end- It'll just slide out".
Well I'm sorry Mr Twist. I always believe everything you say, you wise old sage. But on this you're wrong, very wrong. I had it soaking for 3 days in Penetrating fluid, Duck oil and white spirit. And for three days ( Nay, now.... still) it will not budge. I came close to smashing a very substantial stone wall through my vigour's but it will not budge. I even bent one of the old brake spring ends and tried pulling it out by hooking under the end washer, but no way Jose.
I did then what I normally do when encountered with something unfathomable, Ignore it.
I moved on to removing the reservoir. Should be easy, 2 x quite rusty phillips headed screws. One undid easy, the other was a real swine. I had to drill it out. Four cheap drills of varying sizes later ( one drill [ 1.5mm]broken inside screw !!) left me cursing and very frustrated.
However I managed it,.... eventually. I'd well and truly had enough of the bloody brakes so I moved on.

Moved on to someting not brake related. Namely the weeping core plugs at the RH front of the engine. The one to the left is also weeping but only slightly. Removed the alternator (easy) one plug lead (!) and the oil filter. It was a real swine. I had to utilise two Jubilee clips from the front hose and some precision whacks with the lump hammer.
Horror of Horrors....................................more later !
The core plug came out easily with a poke of a small screwdriver. Cleaned up nicely, smeared with gasket sealant and popped in firmly with a large sockett and and trusty lump hammer. The one on the left would not come out so easily. It was leaking because it wasn't in squarely. Another precision tap with sockett and hammer and in it went, true and square.
At least thats one of the many problems resolved.
Now on to the Horror of horrors I'd been ignoring for ages.
On removing the oil filter the remains saw masses of "emulsified" engine oil. I'd noticed some months and months earlier after a brief run of the engine, but this looks fairly serious. A massive failure of the head gasket methinks, mehopes.
A years or two ago I'd removed the head, cleaned it up nicely, polished the valves and guides and gave it a good clean. A new gasket set from Mechspec and it was back on and has run afterwards. So where is the water coming from ? I hope it is the head gasket. I now regret using the red gasket sealant when re-fitting. This time I'm going to use an original copper gasket.
What a balls ache though having to remove the head. Anyone who's ever done one will know.
Remove all hoses, cables and wires. Undo carbs ( very fiddly) and exhaust manifold + inlet manifold. Remove tappet cover and rocker assy. Undo all head bolts and lift off. Easier said than done with all that gasket sealant I lalloped about last time.
I must admit I'm at an all time low with the car. I seem to be spending all my time on small, fiddly and as then presumed "servicable" parts. Spent a fortune on the suspension, brake discs, pads and piping only to be thwarted by my own stupidity and impatience.
So, all I now require is a brake sensor, reservior screw, Master cylinder seal kit, new fulcrum rods/clevis pins for clutch and brake slave cylinder, head gasket, 20/50 oil and I'm all sorted. When though?
Last post saw me frustrated at my lack of ability ( and assistance) regarding bleeding the brakes and clutch. I grabbed the bull by the horns and read up thoroughly on the task at hand ( well, surfed more like) and I happened upon a real nugget of vital information on the Chicago clubland forum. "You have to loosen the brake sensor ( located under the master cylinder) three and a half turns, or bleeding is impossible". Why did I have to seek so hard to find this out ?
Mr Porter, Mr Evans and even the noble Mr Twist say nothing of this fact.
Anyways it was a real eureka moment and spurred me on after another night shift at the very large Hospital (27 miles of corridors, yes 27, and I think I walked most of them that shift looking for the equipment and ward)
So undo the plastic sensor after first removing the two wires easy peasy. Too easy. The f***ing thing had seized solid in the threaded portion leaving the body to spin and spin. Acces is very poor as its on the underside, so there was no other thing to do other than remove the master cylinder.
My thinking was since I am removing it why not do a complete refurb of the seals then. A nice YouTube from Mr Twist even showed me how.
Wrong, Wrong very wrong.

Easy enough to remove from the car, 2 x 1/2" nut/bolts. Even managed to remove circlip from inside ( After "modifying" my { wife's actually but she don't know this yet} longnose pliers).
Innards came out easily, 2 x springs, 2 x shuttles + 4 x seals. I had to drive a screwdriver into the hole left by the broken body of the sensor and manfully undo it outwards. This done then on to the other end of the cylinder to remove the small shuttle and spring. The lovely and wise old sage Mr Twist says " wear a glove and tap it firmly on its end- It'll just slide out".
Well I'm sorry Mr Twist. I always believe everything you say, you wise old sage. But on this you're wrong, very wrong. I had it soaking for 3 days in Penetrating fluid, Duck oil and white spirit. And for three days ( Nay, now.... still) it will not budge. I came close to smashing a very substantial stone wall through my vigour's but it will not budge. I even bent one of the old brake spring ends and tried pulling it out by hooking under the end washer, but no way Jose.
I did then what I normally do when encountered with something unfathomable, Ignore it.
I moved on to removing the reservoir. Should be easy, 2 x quite rusty phillips headed screws. One undid easy, the other was a real swine. I had to drill it out. Four cheap drills of varying sizes later ( one drill [ 1.5mm]broken inside screw !!) left me cursing and very frustrated.
However I managed it,.... eventually. I'd well and truly had enough of the bloody brakes so I moved on.

Moved on to someting not brake related. Namely the weeping core plugs at the RH front of the engine. The one to the left is also weeping but only slightly. Removed the alternator (easy) one plug lead (!) and the oil filter. It was a real swine. I had to utilise two Jubilee clips from the front hose and some precision whacks with the lump hammer.
Horror of Horrors....................................more later !
The core plug came out easily with a poke of a small screwdriver. Cleaned up nicely, smeared with gasket sealant and popped in firmly with a large sockett and and trusty lump hammer. The one on the left would not come out so easily. It was leaking because it wasn't in squarely. Another precision tap with sockett and hammer and in it went, true and square.
At least thats one of the many problems resolved.
Now on to the Horror of horrors I'd been ignoring for ages.

On removing the oil filter the remains saw masses of "emulsified" engine oil. I'd noticed some months and months earlier after a brief run of the engine, but this looks fairly serious. A massive failure of the head gasket methinks, mehopes.
A years or two ago I'd removed the head, cleaned it up nicely, polished the valves and guides and gave it a good clean. A new gasket set from Mechspec and it was back on and has run afterwards. So where is the water coming from ? I hope it is the head gasket. I now regret using the red gasket sealant when re-fitting. This time I'm going to use an original copper gasket.
What a balls ache though having to remove the head. Anyone who's ever done one will know.
Remove all hoses, cables and wires. Undo carbs ( very fiddly) and exhaust manifold + inlet manifold. Remove tappet cover and rocker assy. Undo all head bolts and lift off. Easier said than done with all that gasket sealant I lalloped about last time.
I must admit I'm at an all time low with the car. I seem to be spending all my time on small, fiddly and as then presumed "servicable" parts. Spent a fortune on the suspension, brake discs, pads and piping only to be thwarted by my own stupidity and impatience.
So, all I now require is a brake sensor, reservior screw, Master cylinder seal kit, new fulcrum rods/clevis pins for clutch and brake slave cylinder, head gasket, 20/50 oil and I'm all sorted. When though?
Thursday, April 05, 2012
When cash is not enough
So, how to explain the title then ?
Last post saw me list a long long list of stuff I needed to buy to make some progress. Well now I've been paid (twice) I did spend some hard earned cash on the following :-
... New Rear Brake pads, pins, clips etc
... One ( Yes, one) brake caliper cylinder. More of this later.
... Brake fluid ( 5 ltrs) a little overkill on volume, but again more on that later.
... Rear brake piston seal kit/s, springs and pins.
... Rear 1-5/16" sockett (for rear centre nut)
... Pair of rear hub to axle seals.
That little lot came to over £95. I felt guilty over the amount, however it was needed and I'd earned the right spend some cash after a good few frugal winter months.
Initially all went well. The rear oil seal hub to axle was easier than expected courtesy of a lump hammer and flat softwood timber.
The first problem was the slight "clunk" from the axle when turning the wheel in either direction. I know all MG's have this but how much is acceptable ? At the worse its the drive shaft splines f***ed. At best the diff pinions oil seats have disintegrated. I'm still annoyed I did not discover/address this issue last summer when all the rear axle was removed and re-painted together with the suspension renewal/lowering.
Ho hum. I decided its best to worry about this issue when the car is up and running, after all I'd got parts to fit.
Some good news was that in the box of parts that arrived was a complete rear brake cylinder. I didn't order it but was charged for it so I decided to leave it for now and get on with both cylinder refurbs. The a real conundrum started. Once I'd removed the RH cylinder from the back plate how the hell do I get the main plunger out. Moreover, it was rusted solid in there and was immovable. I decided to fit the new one, hoping the other side was not as bad. Fortunately it wasn't, so a good soaking in penetrating fluid and a few taps with trusty lump hammer and wood saw the job done, refitted to back plate, springs and old shoes (old but with lots of facing material on them) fitted and ready for action. The handbrake cable was a challenge to re-fit at the final side, which required some clever leverage with a set of water pump pliers and five pairs of hands, but on other job done. Even managed to set the shoes to grip with the handbrake after slight adjustment.
I'm writing this on Thursday teatime ( Prior to Good Friday) and just popped out for a smoke to ponder on the Issues I'm about to write of, when looking down at the floor near the MG I see a small washer. On inspection it turns out to be a shim washer........and I know where from !!!! Please bear with me and as I'm getting a little ahead with this welcome discovery and diversion. But it could be IMPORTANT to my woes !
Have to go now as a bottle of whisky is calling after the end of a good few days on my first night shift rota. TBC.
So to continue.
I was feeling rather smug with myself after fitting most of the brake parts and having a copious supply of brake fluid. So all that remained was to fit the front calliper seals and pistons, fit whole lot to car, fill up with said fluids, bleed and another milestone reached.
Second problem.
I'd bought only one new front brake piston as it had rusted solid in situ and took some ingenuity to removed (see earlier post). The other three pistons were deemed o.k to re-use in the name of economy and originality. But where were they ? I hunted high and low, in and out, shed and desk drawer but nowhere could they be located. After a lot of thinking and more hunting I decided I must have thrown them away. I don't remember the decision but in hindsight I must have done, as it could be deemed foolhardy not to replace a complete set. So another job has to be shelved and 3 more pistons ordered.
What next then ? I'll do the clutch. Should be easy peasy. fill up, bleed and hey Ho, a working clutch. Wrong, very wrong.
The pedal travel was very easy and soft even with the bleed nipple open fully. I decided to remove the slave cylinder to inspect it. What a sad sight. Its piston ( without protective rubber boot, I presume long since disintegrated) was also rusted solid and was never going anywhere, in or out. It looked impossible to pull out,being half in, half out of the bore with nowhere to grip onto to pull. After a lot of failed attempts at grippy things, small screwdrivers and penetrating fluid I had to resort to some bodging. That's after I'd already looked on line at the cost of a new unit ( how much !).
I drilled a M7 hole in the end of the piston and tapped it M8. Using a long-ish M8 bolt, large washer and the next door neighbours G clamp and a large adjustable spanner it was screwed out ala piston removal for front cylinder. Why a G clamp you might ask ?
Third problem
Well the trusty workmates sad and knackered makeshift jaws had truly given up the ghost, hence begging a G clamp to grip it whilst screwing out. Anyways it did it after a lot of swearing. Trouble was the cylinder piston now had a M8 shaped tapped hole through its centre. Next came a spot of Lostsock ingenuity again. I inserted M8 screw the other way covered in epoxy glue, just enough to allow the clutch lever rod to seat in the bottom. Waited till the epoxy had set and sliced off the back ( The inside part of the piston) with the trust scary grinder with thin cutting disc. It worked a treat and was very neat. I'm a poet but don't know it.
The innards of the slave cylinder were very black and cruddy but the seals were good after a thorough clean and flush out. Unfortunately an new rubber boot is not available for the clutch end so I fitted it anyway and got ready to bleed.
Fourth problem
Bleedings not easy. Especially when you have no willing assistant. Yes, the entire Lostsock came to help, but got fed up and abandoned me after 5 minuted each. The piston in the slave cylinder did not appear to move much, and only a dribble of fluid came out of the bleed hole, plus the pedal was very very soft. I decided to investigate the clutch master cylinder. Top bolt easy to undo, bottom bolt IMPOSSIBLE !. there is not enough room to swing a spanner or get access to the bolt head. Again BBS forum came to the rescue. A universal joint is required, extension and attack it from the inside dash compartment. For me easy as the dash is out . Bought and 250mm extension, ground a 3/8" square on the end of my 250mm universal joint and bingo. God it was difficult though. Only half, nay 1/4 of a flat turn possible. But after about an hour out it came. Disassembled easy enough and ordered a new seal kit ( along with the 3 pistons for front callipers).
Its at this point things are a little hazy. The seal kit was fitted. Its not easy and I had an extra seal ?
Two tapered seals were obvious enough although a little difficult to fit but where did the third small "cap like" seal fit ? Over the end of the spring ?. I fitted it there and tried again. See Lostsock struggle to fit the bolt. An hour later it was back in place. An hour later saw the clutch pedal stay down when depressed. That's just how I felt, depressed. I removed the master cylinder again, disassembled and removed the "cap" seal. Refitted ( another 45 mins this time) and cajoled son No 1 to help with the bleeding. progress at last, a flow was happening at the bleed nipple.
Fifth Problem
The pedal (and master cylinder piston) kept sticking. My only option was to remove the nut and union at the back of the assembly and use a long thin Allen key to push the piston back. However after two days of constant backache, frustration and bewilderment I gave up. Where, if at all should the "cap" seal go ?
Sixth problem
I'll bleed the brakes then. It cant be that difficult. I started on the Rear LH bleed nipple. This time with some co-operation from Son No 1. Nothing !! Not even a dribble. Only bubbling from within the brake reservoir on pedal upstroke. Tried other three nipples, same thing. Gave up to ponder my fate and hope new master cylinders are not required.
Seventh problem
On poking around the engine bay I noticed that 2 core plugs are leaking. Damn. Fortunately they are easily accessible near the oil filter and alternator. Its just another woe to add to a frustrating restoration and when I thought money was the answer to progress.
So, halfway through writing this I found the shim washer outside. Trouble is I can't remember where its from, Clutch slave or master cylinder. I do think it will solve a problem, which problem though. Should I move on to the bodywork for a while ?
Workwise, I've finished my 6 week induction period and am on the rota proper. This has already seen me do a 2 day night shift stint and a Saturday (Very hard work, remind me not to work this day in future) But it does mean I will get occasional daylight hours at home and if I have the motivation sort out the damn car. Lets have some encouragement from yer then...........please !
Sunday, January 22, 2012
At the ready
Sorry for not posting sooner. Its the longest I've gone without an update or progress report. An educated meander at previous years post's sees the same thing. Its the weather y'know.
I think I've changed my wish list from
# 1 Garage
to
#1 Heated Garage
Fortunately this year so far has not seen any snow, however there has been Wind, lots of it. I must have been to re-arrange the mishmash of poly covers on the car several times a day but now I've given up. Its waterproof ( I think) and enjoys flapping aimlessly and making an annoying flappy noise with each gust.
So what are the plans for the MG then ?
Since I now have a job, but haven't started yet, real progress is at least 3 months away when paid, debts and x-mas paid off and finances back on track.
I did purchase a pair of rear axle/hub oil seals early Dec which were going cheap on e-bay but not fitted them yet. The main reason being my lack of 1"5/16 socket for the rear wheel nut. Why did BL make the front and rear different sizes ?. Several trawls round my local Thursday flea market ( always good for second hand tools and old engineering stuff) has proved fruitless.So no progress on the seal replacement. Apart from which as I said earlier, the weathers been crap. I also have ( by way of x-mas prezzie from wifey) a pair of front bumper Irons ( yes...e-bay again, bargain at £5) to fit.
Enough chitter chatter, here's a list of the jobs to do, not necessarily in this order.
1/. Re-fit oil cooler hose and route/ fix permanently (or as permanent enough to stop another disaster)
2/. Flush Radiator and heater to cure running hot issue
3/. Top up with oil and water
4/. Fill clutch reservoir and bleed
5/. Replace front brake cylinders and seals, buy pads/pins/ fluid, fit and test.
6/. Get to bottom of why filling stations air lines valve connector won't fill my tyres/valve.
7/. Buy 1"5/16 socket...........Maybe. Then replace rear oil seals
8/. Remove rear back plate and refurbish brake cylinder with new seal kit/s
9/. Run engine and check engine hot running/water oil mixing in rocker box.
10/. Fill brake system, bleed and test ..see 6/. ( methinks scary grinder had "dabbed" valve !!)
11/. Finish bodywork and fit interior
12/. Re-spray, MOT, Insure and off I go
O.K maybe 11/. and 12/. may have been simplified somewhat (yes... a lot) but 1/. to 10/. is enough to see me through till early summer, if the weather is dry and wind free. A very big if for UK residents.
If things go well work wise and I can get a grip with the bodywork fiddly bits then maybe just maybe this year will see the car on the road and finished ( Is it ever "finished" ?)
Oh and just as a passing note, totally unrelated, here's me graduating last week. Just to prove I do finish some things.

Wednesday, November 30, 2011
Whilst its quiet
Yes. I know I've had an annoying little issue with the MG ring hijacking my site, but I think I've cured it now.
So, since no-one has made any comments for ages a few words of encouragement would not go amiss, so please add comments just to let me know there are people out there in cyberspace reading. Donations of hard cash are also gratefully accepted, after all the kids need new shoes.
So, since no-one has made any comments for ages a few words of encouragement would not go amiss, so please add comments just to let me know there are people out there in cyberspace reading. Donations of hard cash are also gratefully accepted, after all the kids need new shoes.
Tuesday, November 08, 2011
spring thing and more work
Well, the front suspension is finally finished, discs purchased and fitted and the car lowered to the ground at long last.
The fitting of the disc was easier than I thought. I did have reservations regarding the hub to disc bolts. They were a swine to remove. I had to drill the bolts out since the back face did not allow for a spanner or my socket access. In the end I found a long forgotten box spanner of 14 mm that did the job just fine with accompanying 1/2" socket.
Also the oil seal to hub was tricky to remove but replaced with a brand new pair, using a nice new flat section of 1" x 3"x 6" timber, liberal grease and lump hammer.
 The only blot on the landscape was the final ride height. It looks too high, even thought I've replaced the spring with one over 1-1/2" shorter.
Also, since the two wheels/tyres had been used as makeweights for the car cover, when fitted and lowered back to earth one was flat as a fart.
That's when the faffing started.
I visited three filling stations ( all with the same type of inflator) only to find out the business end of the inflator does not fit my valve. Strange that, since I've inflated them before ( albeit years ago) and did not have an Issue.
The economy run continues so I've decided to replace only one brake cylinder but both side's caliper seals in full, re-use the existing hoses and buy standard pads,clips and re-use the rear brake shoes.
I've even fitted the bump strap bolts since I can now jack up the rear end.
 Son also helped me push the car to turn it round on the drive ( again).
After inspecting the RH rear hub/back plate I discovered the back plate was slightly oily/cruddy and some slight play in the drive/hub/spline. I'll do what I normally do for this rather expensive repair, Ignore it for now. At the least it is just pinion crown wheel spacer wear and worse half shaft spline wear with weeping oil seal. Thank god for the wonderful John Twist of University motors. I urge you all to visit youtube to see his wisdom and educational dedication to the marque for would be restorers.
So next on the list is more sanding (wether [ and weather] permitting) since I should buy the caliper and pads plus fluid ,but that looks like its going to be a Christmas present due to some ongoing financial embarrassment ( No job as of yet).

Above is the RH hub. Sorry as it a little blurred ( I was cold, wet and fed up )
The fitting of the disc was easier than I thought. I did have reservations regarding the hub to disc bolts. They were a swine to remove. I had to drill the bolts out since the back face did not allow for a spanner or my socket access. In the end I found a long forgotten box spanner of 14 mm that did the job just fine with accompanying 1/2" socket.
Also the oil seal to hub was tricky to remove but replaced with a brand new pair, using a nice new flat section of 1" x 3"x 6" timber, liberal grease and lump hammer.

Also, since the two wheels/tyres had been used as makeweights for the car cover, when fitted and lowered back to earth one was flat as a fart.
That's when the faffing started.
I visited three filling stations ( all with the same type of inflator) only to find out the business end of the inflator does not fit my valve. Strange that, since I've inflated them before ( albeit years ago) and did not have an Issue.
The economy run continues so I've decided to replace only one brake cylinder but both side's caliper seals in full, re-use the existing hoses and buy standard pads,clips and re-use the rear brake shoes.
I've even fitted the bump strap bolts since I can now jack up the rear end.

After inspecting the RH rear hub/back plate I discovered the back plate was slightly oily/cruddy and some slight play in the drive/hub/spline. I'll do what I normally do for this rather expensive repair, Ignore it for now. At the least it is just pinion crown wheel spacer wear and worse half shaft spline wear with weeping oil seal. Thank god for the wonderful John Twist of University motors. I urge you all to visit youtube to see his wisdom and educational dedication to the marque for would be restorers.
So next on the list is more sanding (wether [ and weather] permitting) since I should buy the caliper and pads plus fluid ,but that looks like its going to be a Christmas present due to some ongoing financial embarrassment ( No job as of yet).

Above is the RH hub. Sorry as it a little blurred ( I was cold, wet and fed up )
Sunday, October 09, 2011
The romance of sandpaper and filler is over
How long did it last you ask. Well not very long. A few years ago when I started I managed to fill and sand the odd "ding" around the car. This was very satisfying and I was in love instantly. A few deft and lingering strokes from the plastic spatula, some gentle stroking of the lovely curves with 80 grit and a gentle caress of 120 grit left my heart and spirits leaping with joy. How wonderful the world is.
Next up was the welding of new lower sections to the front wings. It needed a lot of filler and even more sanding. It needed several " attempts" to get a smooth curve. I got a little tired and it was beginning to be hard work, if not difficult. To keep things moving I looked elsewhere ( engine bay) and I began to feel a little guilty leaving the filler and sandpaper forlorn in the boot space. At least they were with all their other friends like " Red Lead", "Stopper Filler" and "Cork sanding Block". After what seemed ages I was ready to renew the romance. But alas filler had become cold and hard with time and 80 grit was torn, wrinkly and in shreds. I was skint and unable to frequent the haunts of similar acquaintances for a long time ( Halfords).
It was mid summer some years later when a breeze of opportunity ( some spare shifts in pub) came along we had the opportunity to become very familiar again. But where could we be together, alone and doing what were were made for. The Front Lower Valance of course. This was an Item long forgotten and abandoned in the depths of the shed, ignored and replaced in my dreams, head and heart by a ST spoiler.
How fortunate fate can be. Just when I was at my lowest ebb and resigned to re-using as many original as possible parts ( due to being unemployed ) we became entwined once more.
After several coatings of filler in strategic areas and sanding with 80 grit I again became a little weary of the elbow and wrist work required to be well satisfied. I again looked elsewhere. The RH door skin was the obvious choice. Coated in a heavy layer of "Red lead" with a dusting of primer, it had been in my vision every time I lifted the car cover. I always thought it would be a big ask to get it something like ready for final paint prep but the challenge was there let alone serious temptation ! what else can a man do ? So I did .
Here it is just after starting
 A close up will show that the red lead looks like it had been applied with a very stiff bristle brush. This outlandish sight ( done by me years ago in the first flush of Restoration youth) is what had been teasing me for years almost saying " come on and tackle me if yer dare, I'm deep and streaky and cover a huge curved area". The grey primer acting as a guide coat, it took ages and ages. Almost 2 hours in fact and my shoulder was aching, fingers were sore and hands stiff.
Look done ! I was well spent though and I'm sure I heard the door ask me what I was thinking !

Next up was the welding of new lower sections to the front wings. It needed a lot of filler and even more sanding. It needed several " attempts" to get a smooth curve. I got a little tired and it was beginning to be hard work, if not difficult. To keep things moving I looked elsewhere ( engine bay) and I began to feel a little guilty leaving the filler and sandpaper forlorn in the boot space. At least they were with all their other friends like " Red Lead", "Stopper Filler" and "Cork sanding Block". After what seemed ages I was ready to renew the romance. But alas filler had become cold and hard with time and 80 grit was torn, wrinkly and in shreds. I was skint and unable to frequent the haunts of similar acquaintances for a long time ( Halfords).
It was mid summer some years later when a breeze of opportunity ( some spare shifts in pub) came along we had the opportunity to become very familiar again. But where could we be together, alone and doing what were were made for. The Front Lower Valance of course. This was an Item long forgotten and abandoned in the depths of the shed, ignored and replaced in my dreams, head and heart by a ST spoiler.
How fortunate fate can be. Just when I was at my lowest ebb and resigned to re-using as many original as possible parts ( due to being unemployed ) we became entwined once more.
After several coatings of filler in strategic areas and sanding with 80 grit I again became a little weary of the elbow and wrist work required to be well satisfied. I again looked elsewhere. The RH door skin was the obvious choice. Coated in a heavy layer of "Red lead" with a dusting of primer, it had been in my vision every time I lifted the car cover. I always thought it would be a big ask to get it something like ready for final paint prep but the challenge was there let alone serious temptation ! what else can a man do ? So I did .
Here it is just after starting

Look done ! I was well spent though and I'm sure I heard the door ask me what I was thinking !

Just about 90% of the red lead had to be removed. What was I thinking all those years ago. Still it had been protected from the ravages of the dreaded tin worm and needed very little filler. The romance was already fading for the filler at least and the sandpaper and I needed a break too !.
We (The front Valance and I ) were all re-united through a rather unwelcome but now oft frequent bout of skintness and restlessness.The door had to be left abused and part naked due to the fact I had only a little grey primer (and no money to buy more) the hammerite KuRust was almost all gone but lasted to serve one more time.
The Valance, originally abandoned due to many small but heavy impacts low down and lots of rust patches deeply ingrained. Fortunately I did give it a coating of heavy grey primer all those years ago, but oh the filling and sanding. I so far have had about 5 attempts of filling and sanding and its still not perfect. I don't want perfection I just want it all to end because I'm thoroughly fed up with it all. And the romance is dead in its tracks..........for now at least.
I could not even be bothered to take a photo. Maybe I will next time..if I can afford some primer.
Sunday, October 02, 2011
Taps, dies and poverty
Well. we'll start with the poverty bit first.
Since I've qualified as a Radiographer, guess what ? there's bugger all jobs about. So the household is really living on reduced means, Heinz beans, shouts and screams and shattered dreams. So the MG fund is at minus lots and lots. The front suspension is assembled and waiting for cash to buy split pins ( of the correct size MGOC !!!) Two new pistons for the brake calipers, seal kit for both calipers, pads, pins and brake disc+ bolts/nuts, inner bearing seals, shim kit and brake/clutch fluid.
The fund is so low that I'm going to have to re-use the rear brake shoes I removed years ago ( still plenty of material on them though) and not replace the rear brake adjuster/cylinder, just clean up and re-fit. That should see the car back on four wheels and mobile-ish !

 See the suspension looking new and wanton for discs and wheels.
Taps and dies bit I referred to relates to the front wings where they attach to the bonnet gutter, front valance and inner footwell mountings. The front valance mounting points on both wings is a mish mash of removed bolts ( leaving perfect but rusty 1/4" UNF tapped holes) large 3/8" hole where captive nuts have been ground away ( done years ago in deep mid-winter ) and broken 1/4" UNF bolt stuck in-situ ( I must have given up or got too cold and frustrated). Either way ,not having any cash and plenty of time I decided to tackle the RH wing first as its not attached properly ( One bonnet gutter bolt and a mole grip on the front sill). A wander into town on market day, Thursday, saw me trawling the flea market for the tools stalls. Normally they sell all manner of cheap imported crap tools, however I use them lots and know where to go to get the oft used/broke last time type of things like 1/8" dia drills ( 5 for a £1) flappy grinding wheels (£1.50) and 5 sizes of boxed mm drills ( also £1). They had taps and dies too... all new and metric and expensive for me.
I knew that there are other stalls offering used engineering tools like micrometers, wood turning chisels (lots) vices, planes, end mills and other stuff generally that belonged to some long dead proud engineer. Trouble is its all usually rusty, very rusty. But I knew there would be taps and dies on at least two stalls somewhere. I just had to root around amongst the masses of other "stuff ". "Stuff" being what I don't want. Myriads of 1/4" BSW taps and dies. Same for 3/8" BSW and UNC for that matter. I must have spent a whole hour rooting in rusty boxes and trying to read long since stamped ID markers or "etched" markers ( even harder).
Persistence paid off and I think I got the only 1/4" and 5/16" UNF taps in the entire country. I also got the dies too ! for a grand total of £ 4 ( from two different stalls though ). A good day was had as I usually spent a full ten minutes with wifey looking round the market Thursdays.
These purchases allowed me to open up the RH bonnet gutter threads ( 5/16" UNF ) and with some really expert drilling remove the three broken 1/4" UNF bolts at the lower valence. I also did the four inner footwell mounting holes and the two wing top/scuttle threads.
 Before I forget, above is a photo of the front slam panel with both in primer, promised from last entry.
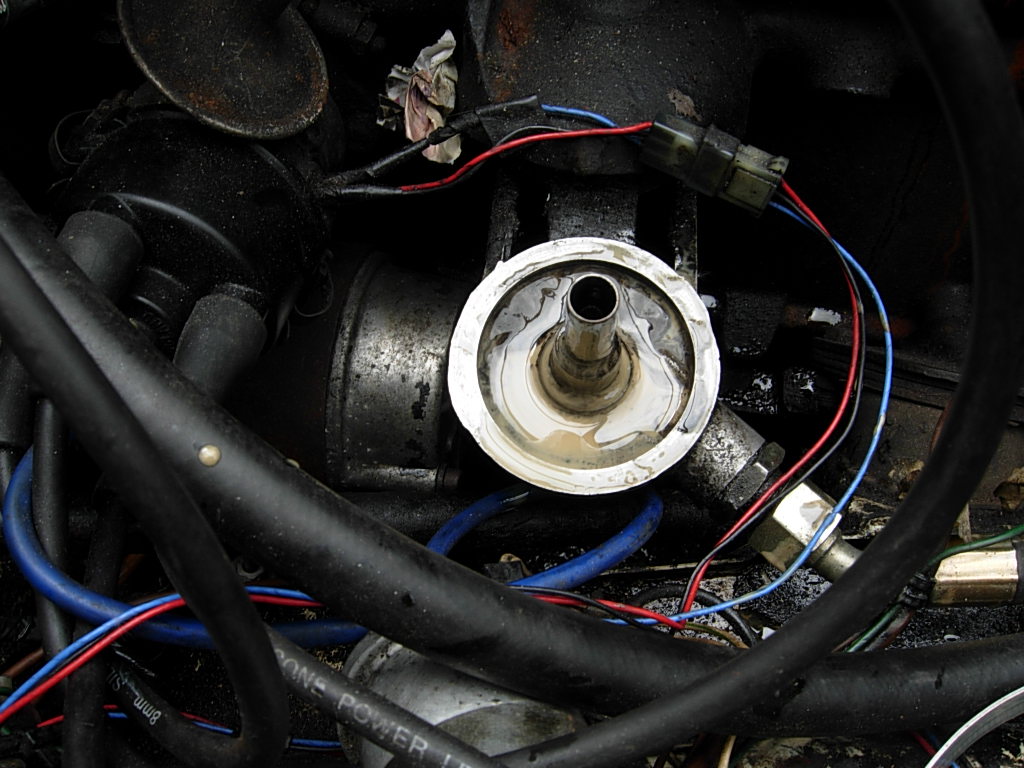
Below is a close up of the slight "oversight" I had with the oil cooler pipe meeting and getting intimate with the alternator fan,

When I get fed up with bodywork I'll re-fit the old hose which was in fairly good nick as it came attached to the oil coller which I bought on E-bay three years ago. I'm gald I saved it now.
Since I'd got the wing at least ready to be fitted I had to dug out the wing attaching bolts from the shed. I was going to buy a new set like I did for the LH side from the MGOC, but I remember the lower sill bolts not being long enough, or at least a struggle to get the nut and washer on the back so I only fitted two.
Strangely enough I found the wing bolts first time and bagged up and labelled ( for both sides).
So 3 hours later I'd ran the die down the gutter bolts, cleaned up the washers and split washers and was ready to do a test fit.
One major issue was that of the RH door, or where the door and wing rear edge meet. Every time I opened the door it caught on the wing roughly in the middle of the edge. It had done it since I re-skinned the door ( another purchase from E-bay) and bearing in mind I'd also welded a repair panel to the base of the wing I expected major alignment issues. I still have alignment issues. The base of the door is outwards a little particularly towards its rear lower edge.
But what i did do was fit the fiddly under scuttle bolt to wing to get an idea of how much to trim the wing rear edge.

See. I'm dead chuffed with it. The gap is nice and even. Still need filler on the mid wing section where the weld is though. But not bad for a beginner and it cost next to nothing to do, only time and a little frustration. I have to do the LH wing too but thats a longer job as all the (new) bolts are in and have been sice I fitted it a few years ago.
 I also fettled the top scuttle a little. This must be the 7th attempt at filling, sanding and primer done long long ago. If left long enough you can attack it with new vim and vigour. Its just what i did.
Must go now as Sunday tea is almost ready and a wine bottle is calling.
Since I've qualified as a Radiographer, guess what ? there's bugger all jobs about. So the household is really living on reduced means, Heinz beans, shouts and screams and shattered dreams. So the MG fund is at minus lots and lots. The front suspension is assembled and waiting for cash to buy split pins ( of the correct size MGOC !!!) Two new pistons for the brake calipers, seal kit for both calipers, pads, pins and brake disc+ bolts/nuts, inner bearing seals, shim kit and brake/clutch fluid.
The fund is so low that I'm going to have to re-use the rear brake shoes I removed years ago ( still plenty of material on them though) and not replace the rear brake adjuster/cylinder, just clean up and re-fit. That should see the car back on four wheels and mobile-ish !

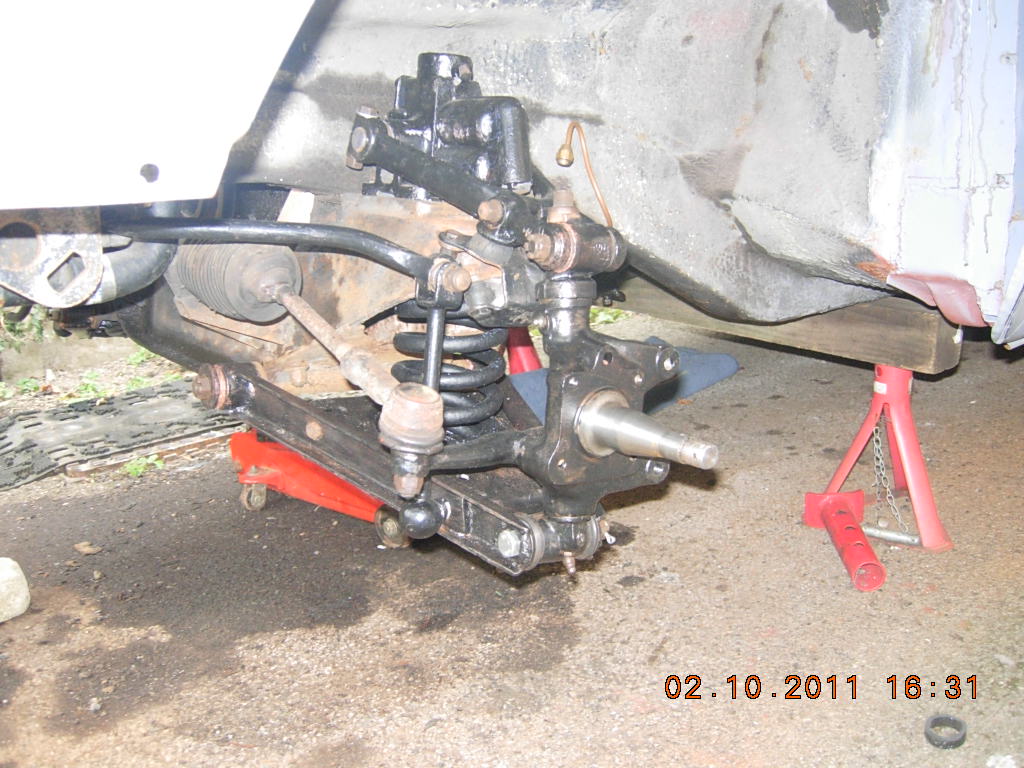
Taps and dies bit I referred to relates to the front wings where they attach to the bonnet gutter, front valance and inner footwell mountings. The front valance mounting points on both wings is a mish mash of removed bolts ( leaving perfect but rusty 1/4" UNF tapped holes) large 3/8" hole where captive nuts have been ground away ( done years ago in deep mid-winter ) and broken 1/4" UNF bolt stuck in-situ ( I must have given up or got too cold and frustrated). Either way ,not having any cash and plenty of time I decided to tackle the RH wing first as its not attached properly ( One bonnet gutter bolt and a mole grip on the front sill). A wander into town on market day, Thursday, saw me trawling the flea market for the tools stalls. Normally they sell all manner of cheap imported crap tools, however I use them lots and know where to go to get the oft used/broke last time type of things like 1/8" dia drills ( 5 for a £1) flappy grinding wheels (£1.50) and 5 sizes of boxed mm drills ( also £1). They had taps and dies too... all new and metric and expensive for me.
I knew that there are other stalls offering used engineering tools like micrometers, wood turning chisels (lots) vices, planes, end mills and other stuff generally that belonged to some long dead proud engineer. Trouble is its all usually rusty, very rusty. But I knew there would be taps and dies on at least two stalls somewhere. I just had to root around amongst the masses of other "stuff ". "Stuff" being what I don't want. Myriads of 1/4" BSW taps and dies. Same for 3/8" BSW and UNC for that matter. I must have spent a whole hour rooting in rusty boxes and trying to read long since stamped ID markers or "etched" markers ( even harder).
Persistence paid off and I think I got the only 1/4" and 5/16" UNF taps in the entire country. I also got the dies too ! for a grand total of £ 4 ( from two different stalls though ). A good day was had as I usually spent a full ten minutes with wifey looking round the market Thursdays.
These purchases allowed me to open up the RH bonnet gutter threads ( 5/16" UNF ) and with some really expert drilling remove the three broken 1/4" UNF bolts at the lower valence. I also did the four inner footwell mounting holes and the two wing top/scuttle threads.

Below is a close up of the slight "oversight" I had with the oil cooler pipe meeting and getting intimate with the alternator fan,

When I get fed up with bodywork I'll re-fit the old hose which was in fairly good nick as it came attached to the oil coller which I bought on E-bay three years ago. I'm gald I saved it now.
Since I'd got the wing at least ready to be fitted I had to dug out the wing attaching bolts from the shed. I was going to buy a new set like I did for the LH side from the MGOC, but I remember the lower sill bolts not being long enough, or at least a struggle to get the nut and washer on the back so I only fitted two.
Strangely enough I found the wing bolts first time and bagged up and labelled ( for both sides).
So 3 hours later I'd ran the die down the gutter bolts, cleaned up the washers and split washers and was ready to do a test fit.
One major issue was that of the RH door, or where the door and wing rear edge meet. Every time I opened the door it caught on the wing roughly in the middle of the edge. It had done it since I re-skinned the door ( another purchase from E-bay) and bearing in mind I'd also welded a repair panel to the base of the wing I expected major alignment issues. I still have alignment issues. The base of the door is outwards a little particularly towards its rear lower edge.
But what i did do was fit the fiddly under scuttle bolt to wing to get an idea of how much to trim the wing rear edge.

See. I'm dead chuffed with it. The gap is nice and even. Still need filler on the mid wing section where the weld is though. But not bad for a beginner and it cost next to nothing to do, only time and a little frustration. I have to do the LH wing too but thats a longer job as all the (new) bolts are in and have been sice I fitted it a few years ago.

Must go now as Sunday tea is almost ready and a wine bottle is calling.
Thursday, September 01, 2011
More progress
Since I'm now officially qualified ( almost, but as yet jobless) I've got a little spare time and a small amount of cash so I tackled the front suspension rebuild.
Last week saw me drive to Mechspec to get the suspension bushes and new oil pipe to complete the long drawn out overhaul.
Trouble was a few days later when I'd set the day aside to do the job I was several small items missing.
Namely the lower fulcrum rubber bush/washer set and two low profile castellated nuts and misc split pins.
A quick call to the MGOC and more parts ordered.
They arrived the following day and the job was back on. It took all day and not without frustration.
Firstly the extra bits from MGOC ( split pins and castellated nuts) were too big. I should day the nuts were too long and the split pins too bigger a diameter. What a balls ache I had to undergo before reaching this conclusion. Lots of hard and tedious spannering in awkward positions on the hard and uneven floor. Come 7pm-ish I was shattered, arms,shoulders and knees all aching. Twas then I discovered a strange fact. The RH stub axle was different from the left ?? Where was the lower grease nipple or hole ?
I had found an excellent You-tube video from Brewer58 showing how the jobs done and which way round to assemble the lower fulcrum bushes/washers. He did say in his vid the earlier done RH side had been done incorrectly whilst showing how its done on the LH side, and he'd have to re-do the RH side which meant jacking up the spring pan, removing fulcrum pins etc.
Well guess what, after some checking and mild panic re said stub axle I found I'd assembled the RH side with the top and bottom fulcrums inwards not outward ( or out and not in, forgot now) !!!
So, with tired arms and legs, and fading light I had to do the same. However I managed it in double quick time and did not have to separate too much, I even left the steering ball joint attached.
Initially I was very apprehensive since it meant jacking up the A arm with spring in and lots of potential energy waiting to go "ping" when the jack collapsed or slipped. But it was a doddle with the jack correctly placed and sandwiched with a block of wood.
The following morning I set too aligning the nuts and split pin holes I'd left the night before and turned my attention to the engine and oil pipe gauge/engine connection. This again was relatively easy with access a little restricted but job done.
That meant I could fire up the engine....Yay !!!
Faffed around with the lower water hose as there seemed to be a slight leak ( cured by cutting 5mm off the end of the hose at radiator end) It now seats correctly but is still very close to the steering rack mounting bolt end.
Filled up with water, checked oil level, then panic !!
The oil cooler hoses were not routed properly and oil cooler resting on the side firewall.
So, after some oil spillages from said hoses it was all ready to roll.
Connected jump leads to Renault and after about 1 minute....couch, rumble ROAR !!
AND............no oil or water leaks !!! The water was getting very hot but Oil pressure good at 75 psi
So,I fitted the fan and motor which impeded on the oil cooler pipe/ fan rotor so I pushed them a little way into the engine bay. Connected the fan to the (incorrect at the time) wires to see if the fan kicked in to cool the water and fired her up again.
She started on the button without the jump leads.
Then disaster, a cloud of oil mist and a flying spray of oil in a fan shape across the engine bay, up the wall and on the pantry window !!!!
After moving pretty quickly to turn off the engine the cause was very obvious.
By pushing the oil cooler pipes from the front oil cooler into the engine bay one had been bent slightly and was touching the alternator fan blades, which had eventually worn right through the pipe, and at 75 psi left a right ****ing mess to clean up.
So that was done with a heavy heart on a lovely sunny day using lots of wifeys kitchen roll and a nice coating of oil on some of the engines rustier places.
It was mid morning and I decided to call it a day, I still ached and felt tired and annoyed at my stupidity and the fact I have to buy another hose to make it leak free. I'm sure it has a master plan and enjoys thwarting me.
Next up ( after the hose replacement) is to buy and fit new front discs and hub ( needs sets of shims and inner grease seals) buy two cylinders for brake calipers and set of seals, pads and pins, fit then I can attach wheels and lower down to earth to see the actual ride height.
Then fit rear brakes/shoes fill with fluid, bleed and maybe go on a test run up the cul-de-sac.
p.s I will post pictures when errant daughter is back from hols as she's taken the camera.
Monday, July 18, 2011
two steps forward... etc
Where can I begin. The shortage of cash and other domestic/professional issues have slowed things down to a less than walking pace.
I purchased a new flat wheel/wire brush thingy for the grinder to finish off the last two wheels.
However, since there is no front suspension fitted I didn't feel like using the jack on the diff to totally raise the car from the ground. The way things have been of late I'd probably drop the car and be unable to raise it again. So that was out. It'll have to wait till the front suspension is finished.
What else has been done then ?
Not much. Ground down the RH front bumper chassis front in readiness for the chrome bumper mounting.
The brake calipers got my attention next.
The RH side caliper was split and it was impossible to remove the cylinders. They were almost fully in.
A quick trip to the local filling station to use the air line to try and blow them out was a miserable failure. The air line end only accepts tyre valves.
Nearby was a local garage on a run down industrial estate. I'll try there I thought.
Big mistake. I only needed a quick blip of an airline on the brake hose and job done, but.
The reception was very swish. Round about there was evidence of high performance cars, Porsche, BMW, Jags and a very nice pristine MG midget. At least they might help.
The elderly snooty receptionist greeted me with a curt "Yes". I explained and she replied " are you a customer of ours ?".
Needless to say after 5 minutes of waiting I gave her a get out clause on her return " They're too busy ?" Yes she replied.
So I hot footed to my local repair man who was very obliging. I must add I'd just paid him £350 for the MOT and stuff on the Renault runaround ( Wifeys car).
The LH caliper/cylinders were in a much worse state. Crusty with rust and oily gunge. There was no way a blast of air was going to remove them.
Despite three soakings in penetrating fluid there was no movement, not even round ways let alone outwards.
I desperately ground a clean face onto the ends of the cylinders and welded a steel bar to them so I could apply some leverage.
Well after three attempts, all resulting with the steel breaking free of the weld I resorted to a more logical engineering solution.
I drilled and tapped an M6 hole in the centre of the cylinder and tried using a screw to force it out. Trouble was I wasn't sure if the threads were stripping or not. So, I drilled/tapped three more holes on the inside of the cylinder and tightened in a circular sequence. Bingo, out it came.
![]() top left is the offending cylinder ( with prising out bolts still in situ. Just look at the rust and crud on it though. Bottom right is the same caliper. Rusty but not too bad and should clean up nicely.
top left is the offending cylinder ( with prising out bolts still in situ. Just look at the rust and crud on it though. Bottom right is the same caliper. Rusty but not too bad and should clean up nicely.
The seals were easy to remove and these will be renewed, but also the cylinders need replacing = more unexpected cost, plus the hoses could do with new ones + £ !!.
Eventually in a pit of despair I removed the bump stops. Not easy at all. They were thankfully in good nick so i painted them and the following day re-fitted. It took the best part of the afternoon to attach the 4 nuts per side. The access was fiddly and restricted and not easy with baggy latex gloves on. let alone trying to get the bracket in place and thread the nuts through. I eventually had to drill one of the mounting holes on the end of the cross member out to M10 from M8 to allow the bolts in and the angled top seat properly. I must say its a crap design and allowing bolts to pass through aluminium and steel had corroded the bolt un-spinnable, hence the need for drilling.
The painted Armstrong damper were fitted next. The LH side went on no probs, if a little fiddly with the two bolts nearest the inner wing. The access was again restricted and very little room to swing a spanner. The wifeys kamasa knuckle wrench helped though.
The RH side was a different matter. The inner bolts would not seat and "grab" the threads. I removed them several times and each time with little movement possible failed.
I left it for another day. This time with some gentle persuasion ( hammer) and only attempting one bolt at a time in it ( they, the two nearest the inner wing) went in. TFFT. It still took two hours though !.
Until more money comes my way I'll be concentrating on the bodywork. There are lots of little rubbing down/filling/sanding/wet/dry-ing to do and this is definitely cheap to do, but very boring.
Uni has a few more weeks to run on placement before the final one day assessment ( I failed the last one in unusual circumstances - along story and very depressing ). I did have a job offer which made the episode bearable, but as of a few days ago this was withdrawn. Real bummer, and not much on the horizon either.
Still, I'm trying to remain positive. If I don't sink into a deep depression first.
I purchased a new flat wheel/wire brush thingy for the grinder to finish off the last two wheels.
However, since there is no front suspension fitted I didn't feel like using the jack on the diff to totally raise the car from the ground. The way things have been of late I'd probably drop the car and be unable to raise it again. So that was out. It'll have to wait till the front suspension is finished.
What else has been done then ?
Not much. Ground down the RH front bumper chassis front in readiness for the chrome bumper mounting.
The brake calipers got my attention next.
The RH side caliper was split and it was impossible to remove the cylinders. They were almost fully in.
A quick trip to the local filling station to use the air line to try and blow them out was a miserable failure. The air line end only accepts tyre valves.
Nearby was a local garage on a run down industrial estate. I'll try there I thought.
Big mistake. I only needed a quick blip of an airline on the brake hose and job done, but.
The reception was very swish. Round about there was evidence of high performance cars, Porsche, BMW, Jags and a very nice pristine MG midget. At least they might help.
The elderly snooty receptionist greeted me with a curt "Yes". I explained and she replied " are you a customer of ours ?".
Needless to say after 5 minutes of waiting I gave her a get out clause on her return " They're too busy ?" Yes she replied.
So I hot footed to my local repair man who was very obliging. I must add I'd just paid him £350 for the MOT and stuff on the Renault runaround ( Wifeys car).
The LH caliper/cylinders were in a much worse state. Crusty with rust and oily gunge. There was no way a blast of air was going to remove them.
Despite three soakings in penetrating fluid there was no movement, not even round ways let alone outwards.
I desperately ground a clean face onto the ends of the cylinders and welded a steel bar to them so I could apply some leverage.
Well after three attempts, all resulting with the steel breaking free of the weld I resorted to a more logical engineering solution.
I drilled and tapped an M6 hole in the centre of the cylinder and tried using a screw to force it out. Trouble was I wasn't sure if the threads were stripping or not. So, I drilled/tapped three more holes on the inside of the cylinder and tightened in a circular sequence. Bingo, out it came.

The seals were easy to remove and these will be renewed, but also the cylinders need replacing = more unexpected cost, plus the hoses could do with new ones + £ !!.
Eventually in a pit of despair I removed the bump stops. Not easy at all. They were thankfully in good nick so i painted them and the following day re-fitted. It took the best part of the afternoon to attach the 4 nuts per side. The access was fiddly and restricted and not easy with baggy latex gloves on. let alone trying to get the bracket in place and thread the nuts through. I eventually had to drill one of the mounting holes on the end of the cross member out to M10 from M8 to allow the bolts in and the angled top seat properly. I must say its a crap design and allowing bolts to pass through aluminium and steel had corroded the bolt un-spinnable, hence the need for drilling.
The painted Armstrong damper were fitted next. The LH side went on no probs, if a little fiddly with the two bolts nearest the inner wing. The access was again restricted and very little room to swing a spanner. The wifeys kamasa knuckle wrench helped though.
The RH side was a different matter. The inner bolts would not seat and "grab" the threads. I removed them several times and each time with little movement possible failed.
I left it for another day. This time with some gentle persuasion ( hammer) and only attempting one bolt at a time in it ( they, the two nearest the inner wing) went in. TFFT. It still took two hours though !.
Until more money comes my way I'll be concentrating on the bodywork. There are lots of little rubbing down/filling/sanding/wet/dry-ing to do and this is definitely cheap to do, but very boring.
Uni has a few more weeks to run on placement before the final one day assessment ( I failed the last one in unusual circumstances - along story and very depressing ). I did have a job offer which made the episode bearable, but as of a few days ago this was withdrawn. Real bummer, and not much on the horizon either.
Still, I'm trying to remain positive. If I don't sink into a deep depression first.
Tuesday, May 31, 2011
grinding out a result
The title refers not actually to grinding but the wire brush thingy. Same thing though, it spins very fast and can do serious damage to car and body.
Today saw me get to grips with another two road wheels, since its about the only thing I can do without some cash for the mass of front suspension parts needed.
I have two wire wheel brush thingies. a cup shaped wheel and a straight flat wheel for the grinder and another smaller cup wheel for the drill plus a good curved and flat handled wire brush.
I started with the flat wheeled brush in the grinder and after 2 hours one wheel cleaned both sides !
I was getting tougher on the second road wheel as most of the bristles had gone and it was very difficult to get inside the "join" of the Rostyle.
So, carried on with cup brush till disaster struck, the grinder just died. No amount of shaking and tapping would bring it back to life.
After lunch I sat down and took the grinder to bits. Couldn't see anything obvious, brushes o.k, switch o.k, power to, good. Then it dawned on me, the fuse !!.
What a wally, 30 mins wasted on what should have been the first thing I should have checked.
Doh........
Anyways, here is the scuttle in primer as promised last time

I have husbandly duties next few days so may get more time over the weekend to finish the wheels off (five seems a very big number thinking of the time spent grinding them, 2 and 3/4 done2 more to do !)
More soon...ish
Today saw me get to grips with another two road wheels, since its about the only thing I can do without some cash for the mass of front suspension parts needed.
I have two wire wheel brush thingies. a cup shaped wheel and a straight flat wheel for the grinder and another smaller cup wheel for the drill plus a good curved and flat handled wire brush.
I started with the flat wheeled brush in the grinder and after 2 hours one wheel cleaned both sides !
I was getting tougher on the second road wheel as most of the bristles had gone and it was very difficult to get inside the "join" of the Rostyle.
So, carried on with cup brush till disaster struck, the grinder just died. No amount of shaking and tapping would bring it back to life.
After lunch I sat down and took the grinder to bits. Couldn't see anything obvious, brushes o.k, switch o.k, power to, good. Then it dawned on me, the fuse !!.
What a wally, 30 mins wasted on what should have been the first thing I should have checked.
Doh........
Anyways, here is the scuttle in primer as promised last time

Not very exciting I know, however I've now done the lower section too. I don't look as good as access was tricky in some areas and its not visible when the grille is in. I'm sick of the black paint that's everywhere, this car in the past had one hell of a colour change from White to Black. Now I've decided its definitely going back to White. Which White though ? Wifey likes Old English white, I prefer Glacier White. Anyone know what colour it would have been when made in 1977 ???I have husbandly duties next few days so may get more time over the weekend to finish the wheels off (five seems a very big number thinking of the time spent grinding them, 2 and 3/4 done2 more to do !)
More soon...ish
Saturday, May 14, 2011
more to do too ( two) 2
So, on an overcast Sunday I did what I wanted, sort of !.
I tackled the front bumper mounting ready to fit a chrome bumper mounting ( eventually, when purchased- I have the chrome bumper, but not the fitting bracket)
 The scary grinder made mincemeat of it. see above. I still have the top box section to remove ( the part behind the grill) but wont do that till I've decided what type of grill to buy.
Now I've had time to reflect and give some logical thought to it I think I've cut it back too far. It is level with the crossmember. The diagram and instructions I've seen from the NAMG register shows the original rubber bumper mounting end plate still in situ with only the top box section cut back. Oooh Errr !
So I moved on to something else as the neighbours were out and about outside and trying to enjoy their Sunday too. I wire brushed the rusty crappy back plates with the grinder and whire wheel cup brush thingy. I then painted with the Hammerite rust converter, left to dry and painted with Hammerite matt black. It was a pain to apply as its so thick, however doing this will save about £14 on a part thats not vital or is seen. I also painted the shorter springs I purchased a couple of years ago. This time I used a different matt black paint that was a lot thinner and they looked a treat ( they were an inexplicable light blue colour !). Then I collated all the suspension nuts, bolts, washers and things and labelled them LH or RH. I was afraid of mixing them up, the RH stuff was on drivers seat/rear tailgate/bucket and the LH stuff was in the passenger foot well.
That done, wire brushed the washers and bolt heads and painted matt black I put them away.
Then that's where I started to go backwards.
I spent ages trying to removed the LH nuts and bolts from the hub to disc. Last time I had to drill them out.
This time I had to also. Trouble was the 1/8" drill bit was blunt and dull. Then a brainwave. I clamped grinder into workmate and sharpened drill bit. It took me back 35 years as an apprentice toolmaker. I was then forever grinding drills back to a neat cutting point and it was a knack I'd not lost.
So, after one and half hours the two parts were separated. Long time ? yes, the trusty Bosch electric drill was overheating big time when it was time to use the 3/4" drill bit, so I interspersed this with trying to remove the LH kingpin spacer from the stub axle.
What a performance. The RH side slid in and out like an old sea boot, or even precision engineered part utilising a H7 - f7 sliding fit.
The LH side had been hammered in and would not budge. I had to use the bolt and the inside of an old rubber bush copper liner. Even the it was tough with lots of faffing. Look at the spacer tube once removed. Its been roughly (very) ground to be a hammered in fit !
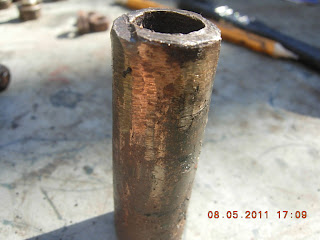

It also means I need a new kingpin and spacer to add to the growing list of unsuspected faulty parts.
After some searching "Watford Classics" can supply the bottom half only + kingpin, second hand for £20 so its not as bad as replacing the whole hub assy at £60 ish.
And I thought I had only to remove the suspension parts, paint them, put on new lower spring and bushes and jobs done. Haa ! 9 months later and the cars still on the axle stands and immobile.
I did tackle the front scuttle with the hand held wire brush and it looks somewhat better.
 This is the "before " shot. I'm still looking for the "after" photo. more soon folks
I tackled the front bumper mounting ready to fit a chrome bumper mounting ( eventually, when purchased- I have the chrome bumper, but not the fitting bracket)

Now I've had time to reflect and give some logical thought to it I think I've cut it back too far. It is level with the crossmember. The diagram and instructions I've seen from the NAMG register shows the original rubber bumper mounting end plate still in situ with only the top box section cut back. Oooh Errr !
So I moved on to something else as the neighbours were out and about outside and trying to enjoy their Sunday too. I wire brushed the rusty crappy back plates with the grinder and whire wheel cup brush thingy. I then painted with the Hammerite rust converter, left to dry and painted with Hammerite matt black. It was a pain to apply as its so thick, however doing this will save about £14 on a part thats not vital or is seen. I also painted the shorter springs I purchased a couple of years ago. This time I used a different matt black paint that was a lot thinner and they looked a treat ( they were an inexplicable light blue colour !). Then I collated all the suspension nuts, bolts, washers and things and labelled them LH or RH. I was afraid of mixing them up, the RH stuff was on drivers seat/rear tailgate/bucket and the LH stuff was in the passenger foot well.
That done, wire brushed the washers and bolt heads and painted matt black I put them away.
Then that's where I started to go backwards.
I spent ages trying to removed the LH nuts and bolts from the hub to disc. Last time I had to drill them out.
This time I had to also. Trouble was the 1/8" drill bit was blunt and dull. Then a brainwave. I clamped grinder into workmate and sharpened drill bit. It took me back 35 years as an apprentice toolmaker. I was then forever grinding drills back to a neat cutting point and it was a knack I'd not lost.
So, after one and half hours the two parts were separated. Long time ? yes, the trusty Bosch electric drill was overheating big time when it was time to use the 3/4" drill bit, so I interspersed this with trying to remove the LH kingpin spacer from the stub axle.
What a performance. The RH side slid in and out like an old sea boot, or even precision engineered part utilising a H7 - f7 sliding fit.
The LH side had been hammered in and would not budge. I had to use the bolt and the inside of an old rubber bush copper liner. Even the it was tough with lots of faffing. Look at the spacer tube once removed. Its been roughly (very) ground to be a hammered in fit !
This now explains why the steering was very heavy ( and why the LH side wishbone holes were Oval )It also means I need a new kingpin and spacer to add to the growing list of unsuspected faulty parts.
After some searching "Watford Classics" can supply the bottom half only + kingpin, second hand for £20 so its not as bad as replacing the whole hub assy at £60 ish.
And I thought I had only to remove the suspension parts, paint them, put on new lower spring and bushes and jobs done. Haa ! 9 months later and the cars still on the axle stands and immobile.
I did tackle the front scuttle with the hand held wire brush and it looks somewhat better.

Monday, May 02, 2011
A little more done means even more to do
Had a great end to my two weeks and a bit off.
Finished the dissertation for Uni ahead of hand in date and well before the extended Easter break so had it very easy, albeit with little or no cash. I packed in the Saturday night job to concentrate the final push at placement, exams and dissertation.
The weather has been glorious and not one day of rain, only sun, sun, sun and a little breeze.
It was doubly difficult since this time or year sees my birthday and inevitable cash for parts come my way. However, my b'day is on the last day of the hols hence the frustration at not having the money earlier, but plenty of time.
That said I have a small sum to spend wisely, but probably not on what I thought all through winter.
I did plan to re bush (Polybush) all the front suspension so its all removed and painted up from September last.( see a few posts ago RE all laid up for winter)
I made a list then and it comprised :-
Poly bushes + roll bar bushes
2 top damper nuts and bolts ( mine were welded on at the nuts !)
2 Brake discs ( well and truly rust bound and scored beyond belief)
4 Nuts + bolts to hold disc to hubs ( why not 8 I here you say, I'll explain later)
2 Inner grease bearing retainers
1 set of shims
1 set of brake pads + pins etc
2 back plates
2 or 4 bottom wishbone arms (see photos of painting/removal..viz oval hole. Is it wise to replace only one side ??)
Misc split pins
Grease...how much and what type ?
I also needed other stuff that was left pending from other little flurries long forgotten about viz:-
Duck oil releasing fluid
Main Engine to oil cooler pipe ( yes I know I should have bought two but I thought the one on the oil cooler I bought from E-bay was o.k - I was wrong)
Flexible clutch pipe ( leaking badly- and in a awkward place too)
I'm sure there's more suspension parts I need but have forgotten, and there's lots more other stuff
such as :-
Inner wing splash panels
front spoiler + mounting bolts/nuts
seam sealer
One wing attaching bolt set
One door bolt set
Anyways, enough of lists, I seem to spend my entire life either making them or thinking of making them.
The last day of my hol saw me wend my way to Thoresby Hall for a classic car show.
And a very good show it was too. I went alone so as to have no distractions and enjoy myself at my own pace. I bought said clutch flex pipe there too for a bargain £4. Normally at least £8 to 10 from the usual suppliers. I was initially billed as a "Mini" east of England show but there was much much more.
Lots of vintage motorcycles and scooters, American 60's monsters with fins ( fantastic, god how much do they cost to respray ??) Triumphs TR2,250, 3,4,5,6,7,8. Many MG's of all types, Humbers, Datsun 240Z's, Fords from the 70 &80's, TVR ( some nice Tuscans) Lotus Esprit ( My dream car), Eclat, Elise, Europa, 7. Jags, Rovers and lots of pre war stuff . I particularly enjoyed the Lambretta/Vespa scooters too ( more maybe later on that topic). All in all a very enjoyable day and I got home around 2.30 in the afternoon.
Just time for a quick tinker then, to "get a bit more done".
I'll start by replacing the flex clutch pipe I've just bought, it should be easy enough now I have the "wonder duck oil". I bought this a few weeks ago on recommendation and it is good stuff, I released the oil cooler pipe nut from the aluminium oil cooler nut housing without any trouble ( unlike a few years ago when I destroyed the old oil cooler trying to undo said nuts using WD 40).
Ha, how wrong can you be.
I'd done the sensible thing and removed the starter motor to aid access. I also found out that I'd only put one bolt back in last time I had the starter motor out some time ago, so its a job well spotted. WTF is the other bolt though?
After lots of swearing, socket swapping, bruised knuckles, dropped tools, duck oil and more swearing I decided I may have to cut through the f****ng thing with a hacksaw. The gearbox end undid easily but could only move One turn due to the pipe twisting. The other end was held in a bracket level with the side of the sump and comprised of flared steel pipe/union connected to inside of flex pipe, large 7/8" loose nut on outside of flex pipe + 3/4" nut as part of flex pipe ( acting as lock nut) well rusted and trapped on bracket. There was very little room. And to make matters worse the 7/8" nut ran down about 3/4" of fine thread. The 1/2" union was impossible to budge due to its location and rust and fine thread.
I got the hacksaw out again and cut off below the pipe body below the bracket so I could get a socket on it. getting somewhere at last. Uunfortunately whilst trying to stop the top steel pipe and union turning, it just sheared the steel pipe above the union.
Just as well really, I was getting fed up and frustrated after such a good day.


Here's the offending items removed ( the Union has gone......somewhere !)
So that means another part adding to my list just so I can at least move the car on the drive.
Job hunting and interviews are next on the agenda then final qualification and hopefully proper paid employment. May just be able to save some money to complete the suspension. Otherwise its back to the old bind of power brush on grinder and de-rusting stuff and primer application ready for whenever. Keep meaning to do the Rostyle wheels but can't be arsed as its messy fiddly and noisy especially on a hot sunny day with neighbours all outside. ( did one last year and it looks good in primer though)
More soon folks. p.s I'm a day older but none the wiser. Time for a drink. I'm in Theatre tomorrow and up for 6.30 a.m.
Friday, March 11, 2011
Shredded, we can put humpty together again !

It relates to my once super dooper car cover. When purchased for £15 from Argos it was great. Heavy duty polythene/vinyl with elasticated bottom and HUGE.
Time and the elements have done their worse and after two spells of high winds during the evenings has seen the silver cover turn into flotsam in many pieces, all held together by the slenderest of elasticated hems.
A few months ago prior to X-mas I did purchase a polypropylene spun undercover as additional protection as the outer cover was beginning to tear a little ( a lot really). The welded seams seemed to be letting go and had been stapled and silicone glued by me but not very successfully. But, good enough to keep out the snow and rain, mostly.
The first recent spell of wind tore the outer cover well and truly and I fought a losing battle with string and elasticated hook things in such a gale force wind. God knows how sailors go on.The following morning saw me in some despair and quite honestly I couldn't give a **it anymore. Any cash I had needed to go towards the suspension parts. Then the saga of the radiators happened ( household radiators not Automotive) so the MG plight was forgotten somewhat. That and the pressures of Uni and studying made my focus elsewhere.
It was only after another bout of weekend gale force wind was attention turned to the eerrant cover.
Was it recoverable ? ( I mean not literally, but figuratively ) viz could I salvage what was left of it or did I need another.Another was out of the question. Argos no longer sold the cover and similar ones were elsewhere were £45 +.
Another trip to Poundland saw the purchase of 2 more hook/elastic thingies and some thick but small polypropylene covers, not bad for £3. Wilko's was next and 2 rolls of proper gaffer tape, the re-enforced type.
So one afternoon when wifey was out I removed the cover carefully, nay teased and coaxed it away from the crevices of the car and deposited it on the kitchen floor ( largest open space in the house )
It was a real puzzle.It was all in one piece ( around the elasticated bottom, just) but in several separate "flaps". I was worried about taping the edges and getting one flap or whole section twisted inside out.
The cover is huge and roughly car shaped, had staples in some areas and dry hard silicone glue in others interspersed with dirt and oil in one corner.
Anyways, after lots or kneeling and logical thought it was finally back together and mostly weatherproof.
As a further precaution I taped a thick polythene film in place of the windscreen and rear screen and re-fitted the cover.
If after the first spell of gales I would have had the hindsight to use the two spare wheels to hold the cover onto the car bonnet and roof maybe the damage wouldn't have been so bad. The cover is big and didn't half flap around in the wind.
Hindsight............................the tool of the foolish. Why is it experience is only something you get AFTER you need it !
Look a pretty picture of the current cover done. Just in time too. BBC say the next few weeks are more wind and snowy conditions.

Tuesday, February 22, 2011
When dreams fade a little
Or , as has been said "the kids need new shoes".
The MG fund has hit rock bottom. Just when I was beginning to dream of summer skies and long uninterrupted weekends working on YooPoo ( The MG, her new name, involving the letter suffix of her registration plate).
Last post I commented that the cash fund was growing quite nicely.
Well now its down to nothing, nought, zero, null, nuffin, zilch.....even bugger all.
Why, well let me explain. You knew I would.
Just before Christmas, Christmas eve actually, wifey asked me to put washing( Towels) onto radiator in conservatory.
Being a good ole Lostsock, and in a good mood I obliged. Only to see a strange bubble in said radiator with a little brown streak running down below. Pushing said "bubble" lead to a very thin stream of water jetting out horizontally into room. Despite my best efforts with the epoxy glue and latterly Mig welder I could not stem the flow. So, after a quick look see from the plumber to empty the rad and cut it out of the circuit a Christmas was spent with one room freezing cold. A Rad would not be available till the first week in Jan , and so it was but with me £ 100 quid poorer. Trouble was that Jan is a very expensive time for us and most people, and Feb sees most of the accumulated Xmas debts paid off.
And it came to pass I felt rather smug at using my hard earned cash to buy the rad and pay the plumber without too much extra debt incurred and some light at the end of the festive financial burden.
As Feb emerged from the torpor of a belt tightening Jan and the light at the end of the tunnel distinctly visible I did the same kindly thing again, yes hung the washing on the radiator, this time in the front room.
Horror of horrors. A huge brown stain down the wall behind the rad and a soaking wet carpet with rusty wet water. It was a big radiator too ( 72" x 37") A quick call to the plumber, a date was set and a price obtained.
£170 fookin quid. And guess what, guess how much I had in my MG pot left ?
No......................... £160 quid, exactly !! That's OK wifey said I'll lend you the rest, its the least I can do.
I quickly and politely reminded her that its "our" house, to which, made her look ready to rev up for a real argument, so I desisted and went back to feeling smug but a little wazzed off.
Just to make matters even worse, the great windy weekend saw my cover ripped to shreds and the clothes dryer ( The aluminium pole with washing line round ) went and snapped clean into two. A replacement is only £35. Since wifey is in charge of where the washed clothes are dried I kindly offered that she might buy this item. I wish it had been the other way round ( she pays for radiators,I buy rotary dryer) but ,Hey Ho.......it all comes out of the same bank account and does nothing to hide my guilt at having (or not, as of now) actual money to fritter away on a "hobby".
As the title says the kids forever need new shoes. I don't know why ? Son is 17 and spends all day in bed, rises at (usually after) lunch and wears JimJams till bedtime. The only expense he generates is food (Lots and lots, normally beans,cheese on toast, scrambled egg, pies and sausage rolls- I keep telling him I'll not perform the colonoscopy in 10 years time) and an electricity bill that could run a small city from leaving every light on possible and making his x-box so hot you could fry eggs on it. Daughter has a penchant for clothes she never wears, creams and emollients to decorate the bathroom, 45,0000 different hair products and again has the same effect as son for the electricity supply ( Namely leaving lights on) Good ole wifey spends, like me, bugger all but has more of a conscience.
At least she gets to spend the £80 or so quid a week on shopping, which was once a joy now denied me as she does it online.
At least I'll be qualified this summer and hopefully in a job within our good old NHS system.
Perhaps then I/we will then have money ? Methinks a holiday is well due first though, if only. A lottery win of modest proportions will do fine. Not much to ask is it ?
So, in a nutshell I'm well and truly skint. I've already told the landlady ( a couple of months ago) at the pub where I work Saturday evenings I'm quitting come March. So, I am well and truly stuffed, skint, wazzed off (MG wise) and not a little frustrated.
On top of which my health ain't been so good for the last 6 weeks and I'm on my 3rd set of antibiotics.
It could be worse though..........I could have bought a Triumph !!
More soon hopefully, if I've not slit my throat before.
Saturday, October 30, 2010
The Bodger strikes
So, a major spot of "bodging has been found on the LH suspension parts.
Half of the stuff was removed a couple of weeks ago without too much trauma. Except the top "A" arms bolt was loose, (Kingpin top) ( Nay...not enough thread actually).
Removal of the castleted nuts and lowering the spring pan was easy enough. I even managed to undo the drop link from the anti roll bar to the spring pan. It was a struggle on the other ( RH) side as the ratchet head was a little too large to allow the socket to sit on correctly and get enough purchase.
So how did I acheive it on the LH side then ? Simples....I used the universal joint thingy in my ( sorry wifey's) Kamasa socket set, doh ! Its a lot narrower.
So where was the bodging then ?
Since I had free access to the spring pan and the drop link was off I undid the nuts holding on the lower "A" arm. During wire brushing I noticed a large blob of weld ( I first thought it was grease, as one end of everything was covered in 30 year old "stuff") but no. It was weld. I was annoyed and a bit in pain since I was using the scary grinder with the flat wire brush disc in. I managed to "wave it gently" accross my lightly surgical gloved finger, and it stung a bit.
I flipped said arm over to see the full extent of why the weld was there.
So, some heathen had welded on a bog standard washer over the oval hole. What a cheapskate. This even makes me look positively generous.
A quick check with MG hive see the arms a a couple of quid each.
More weld was to follow. Whilst engulfed in a cloud of rust tackling the spring pan orifice I noticed a partucularly difficult patch of rust/old grease which the wire brush did its best to worry.
Once the dust cloud cleared and fufferfour had a good look, this is what I found.


Half of the stuff was removed a couple of weeks ago without too much trauma. Except the top "A" arms bolt was loose, (Kingpin top) ( Nay...not enough thread actually).
Removal of the castleted nuts and lowering the spring pan was easy enough. I even managed to undo the drop link from the anti roll bar to the spring pan. It was a struggle on the other ( RH) side as the ratchet head was a little too large to allow the socket to sit on correctly and get enough purchase.
So how did I acheive it on the LH side then ? Simples....I used the universal joint thingy in my ( sorry wifey's) Kamasa socket set, doh ! Its a lot narrower.
So where was the bodging then ?
Since I had free access to the spring pan and the drop link was off I undid the nuts holding on the lower "A" arm. During wire brushing I noticed a large blob of weld ( I first thought it was grease, as one end of everything was covered in 30 year old "stuff") but no. It was weld. I was annoyed and a bit in pain since I was using the scary grinder with the flat wire brush disc in. I managed to "wave it gently" accross my lightly surgical gloved finger, and it stung a bit.
I flipped said arm over to see the full extent of why the weld was there.
 |
| Weld ??? |
 |
| Ovality bodge |
So, some heathen had welded on a bog standard washer over the oval hole. What a cheapskate. This even makes me look positively generous.
A quick check with MG hive see the arms a a couple of quid each.
More weld was to follow. Whilst engulfed in a cloud of rust tackling the spring pan orifice I noticed a partucularly difficult patch of rust/old grease which the wire brush did its best to worry.
Once the dust cloud cleared and fufferfour had a good look, this is what I found.

Looks like rusty metal in the base was replaced with 3 tons of weld. No wonder the wire brush struggled a bit.
Anyways, I did'nt bother to paint the two "A" arms since I decided to buy new ones. I did paint the pan though, together with all the other stuff removed. Since the weather was good I also removed the anti roll bar ( sway bar for US readers) and had to find a novel way to hang it to dry.

So, there's nothing like showing your undies and smalls in public then, Ha . Hope wifey dont read this.
Mefinks this may be the last of my efforts till springtime, as the feet were freezing as the light faded.
One last point, will the tw*ts who keeps offering me medical "products" via this blog please f**k off, thankyou.
Late addition. The t***s who keep sending me the offers for financial and medical crap have hopefully been thwarted.
Aparrently its the title of the blog post that thier meta-phisers search for. So I've changed it. Lets hope thats an end to it all.
Since not much will happen in Lostsock land MG wise here's wishing you all a merry Christmas and happy new year. If you don't believe in either sorry, your missing a good holiday.
Subscribe to:
Posts (Atom)